 Toward the end of February 2013 a new web 2.0 tool was introduced on Richard Byrne's blog, Free Technology for Teachers. This application allows users to embed links within a video making it interactive. The Mad Video is in free beta at this time.
When you first access the home page, front and center, an example of a video created using this app is available. Above this and along the top users can take a tour (directions for creating an interactive video), access their blog, which includes the latest updates and hints, contact The Mad Video via email and login. Beneath their video is the three step process for making your Mad Video:
- Take your online video
- Add information and tags to your video and
- Then publish, in minutes.
Features include:
- No uploading
- Tag anything (add info, links and actions to any item in your video)
- Share tags and
- Viewer stats.
To start click on the bright yellow button, TRY OUT OUR FREE BETA. You are prompted to create an account with an email address and password or by using your Facebook or Google + account. You also need to read and agree to the Terms of Use and Privacy Policy. A confirmation email is sent to you immediately. (Even though no age limitation is noted I would still get parental/guardian written permission prior to use for those students under 13 years of age.)
When you click on the confirmation link in that email you are taken to a new page for step one. Above the work space you can click on Help to take the tour again, go to the Blog, view your Gallery of created videos or change your username, email address, password or profile picture in your Account. To start making your interactive video, enter in the URL of a YouTube video. At this time only YouTube videos can be used. Click Let's go!.
Your next page, The Mad Video Studio, allows you to:
- Move a tag (People, Place, Product, Pet, Music)
- Move from one scene to the next with this tool and
- Place tags on scene line.
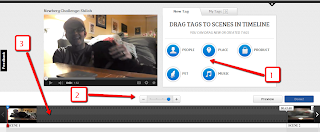
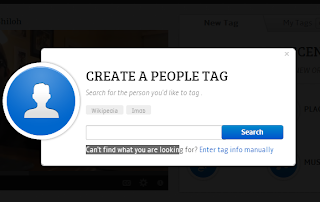 Dragging a tag to the scene line causes a new window to appear. You can search for a tag URL or enter in the information manually. If you enter in the information manually you are asked for a name, description, tag short name, URL address, an image, the choice to add in social profiles (person) and if you want this tag to appear throughout the video. When done you can preview the tag or save it and continue.
Any time you click on a completed tag, you are given the choice to edit the information, duplicate it, preview it or delete it. Tags can be ordered by creation, update or name. They can be filtered by people, place, product, pet or music.
Clicking on and dragging a tag from one scene to the next does not move it but duplicates it for the scene in which you place it. As the video is viewed the tags appear when you mouse over the screen. With a click on tags you can share each individually via Facebook, Twitter, Google+ or on Pinterest. If you select the More info button you go to the site represented by the URL. (preview mode and regular mode for some tags...sometimes a little web icon will appear instead.)
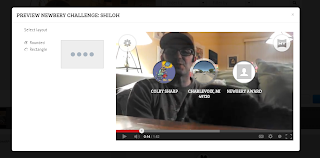 In the upper right-hand corner the icon allows you to view the video at The Mad Video website. The icon in the upper left-hand corner gives the creator the opportunity to have the small tag circles show or not. They provide the viewer with information on how many tags are in a given scene. On the far left you can decide whether you want your screen to be rounded or rectangle. (preview mode)
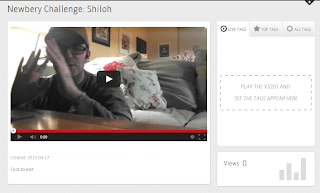 When you believe you have all the tags added click on the blue Done! button. At the next screen there are two different sections. In the bottom section you can view the video. Tags will appear on the screen and off to the right side. If you click the edit button it allows you to include additional comments.
In the upper section you are asked to determine if you want your video to be public (default) or private. You can enter in any appropriate keywords. Rounded or rectangle are options for the gallery. You can still decide to edit, erase or add tags from here too. When everything is completed, choose the blue Publish button.
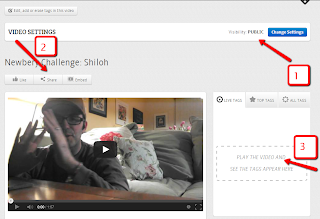
At the next screen you can still make alterations, change the visibility settings (1), share the video with a URL (and on several social networks), by embedding with HTML (three different sizes plus custom) or like it on Facebook, tweet it on Twitter or share on Google+ (2). Just as you could in preview mode the tags will appear on the right when the video is playing. They will also appear on the screen when you mouse over it. (3)
The Mad Video is an outstanding web 2.0 application. The hints and updates on The Mad Video blog are superb. Richard Byrne gives some examples on how to use it in the classroom in his post linked above. I can see an educator using it to tag their own video or an educational video (with permission granted first) to direct students to more detailed information about points made in the video. I think this format could also be used to create an Internet scavenger hunt. I am very excited about the possibilities with this service.
Here is my Mad Video.


No comments:
Post a Comment