
Quote of the Month

When love and skill work together, expect a miracle. John Ruskin


Showing posts with label videos. Show all posts

Tuesday, April 29, 2014

Testing One Two Three--Screencasting With Snagit In Google Chrome

About six weeks ago a tweet appeared in my feed about a new beta tool by TechSmith. (As of April 23, 2014 it is now out of beta.)  This is the same group which developed Jing, an American Association of School Librarians Best Websites for Teaching & Learning 2010.  I use Jing frequently as a screen capture tool with the ability to add an arrow, text, frame and highlight.  You can also use it to record short videos.  It is a free download.

TechSmith has another tool called Snagit.  Snagit has a free fifteen (15) day trial.  It costs $49.95 for a single license per year.  For qualifying educators there are different prices.  Snagit is like a super-duper Jing with many more features.  (This links to the full list of features for Windows users, Mac users.)

The newest tool is Screencasting in Snagit for Google Chrome.  One of the best features is having an image immediately saved to Google Drive.  A link is provided for easy sharing.  Your video can be uploaded to YouTube.  This tool is free.

To begin go to the home page Snagit for Google Chrome. You will need to download the Chrome Extension and Chrome Application.  (Links are provided.) The extension enables you to capture screen images within Chrome.  The application enables you to edit, share and manage your captures plus create new screencasts.  By clicking on the blue +Free button these items are added to your device.  When the application is added it now appears when you click on the Chrome Apps icon.  The extension is shown as an icon at the end of your browser address bar.


Before using these two tools, open the application and click on the small gear icon.  Make sure you place a check mark in the box for Enable experimental features. (Not sure if you still need to do this now that it's out of beta.)  At this screen you can also disable the microphone if you want to make a silent screencast or adjust your microphone volume.  Now you are ready to use the features of Snagit for Google Chrome.


Click on the extension icon to capture a portion or all of your entire screen.  Click and drag to get the perfect area.  You can add an arrow, frame or circle with five different color choices.  The shapes can be resized and rotated.  When adding text the size can be altered, made bold, placed in italics, underlined or text can be struck through the center.  When you click on Share a URL link is shown.  The file can also be renamed.  It is sent to your Google Chrome Library (the app) as well as your Google Drive. 
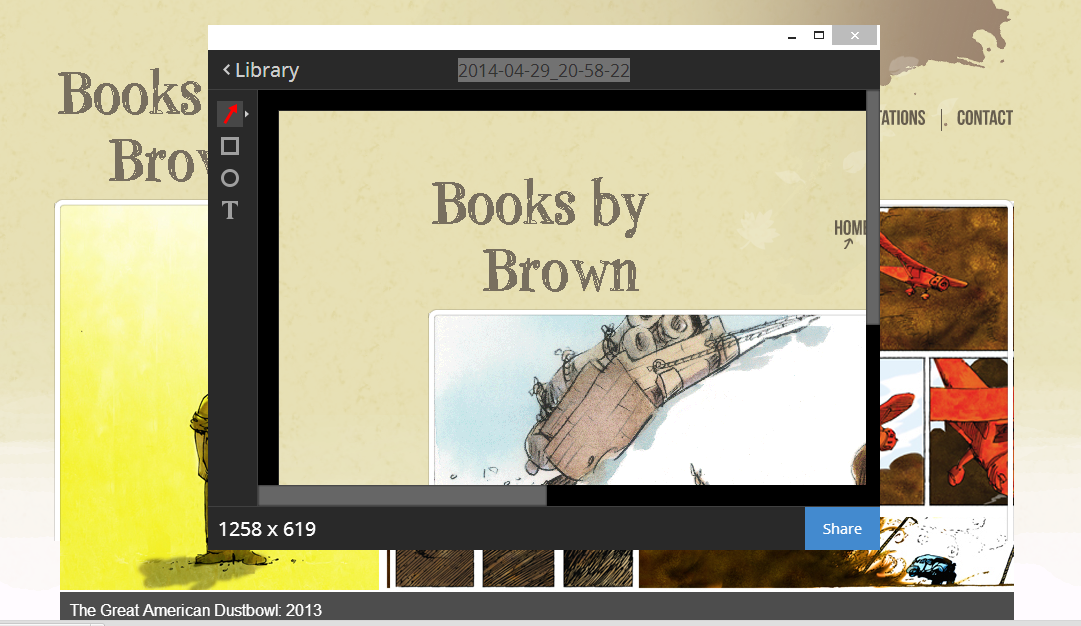

When you open the Snagit for Google Chrome app now, you will see the saved image as well as two small icons above it.  The plus sign is for adding a new screen recording.  The files allow you to see images only, recordings only or everything in your library.


Upon choosing the plus sign a new window opens asking you to choose what you desire to record. (I found that this window opened over the current open tab, showing it as the first choice.) Select the appropriate choice.  When you do, the recording begins immediately.


At the bottom of the screen, as the application is recording, you will see a button that reads Stop sharing.  When you are done recording, click this.  At the next window you can rename your screencast, preview it by selecting the play button or upload it to YouTube.  Once your video has been uploaded to YouTube, the URL link for sharing appears.  Here is the link to my screencast video. 


You could not ask for an easier tool to use for capturing an image and creating a screencast in Google Chrome.  Having images saved immediately to Google Drive eliminates a step and provides easy access.  The screencast was made, saved and shared in a matter of minutes.  The developers of this new tool are eager for input and ways you are using it in educational settings.  Follow the links announcing the beta and the coming out of beta for more information.  Have fun!

Tuesday, April 15, 2014

Flip For Flipgrid--Student Video Responses To Questions

This tweet certainly caught my attention.

When it was quickly followed by these, I knew what my next site to explore would be.


According to information at the home page, Flipgrid is a means for teachers to generate grids of short discussion-style questions.   Students reply to those questions through video.   Everyone can share the videos.


Each grid is composed of any group with a common element with an unlimited number of questions and unlimited number of responses per query available.  The cost is $65.00 per year for the teacher which includes ten grids.  There is a twenty-one day trial period available.  Students do not pay or register.

Communication with students is done via email.  They can create a snapshot photo with fun filters prior to recording their video using their device's (computer and iPad currently) webcam.  Videos are ninety seconds long.  The privacy and sharing is dictated by the administrator (teacher).

In the upper right-hand corner you can Get Started, read the informative FAQ, log in as the administrator or complete a form to contact the Flipgrid team. A new window overlays the home page when Get Started is selected.  You need to specify the type of educational institution.


After choosing Next Step, the new screen explains the pricing.  For the purpose of this post, I choose Demo.  When the form is completed, the terms of service read and the final green bar is clicked, an activation email is sent to get your account started.  You are asked to create a password.


When you log in for the first time, a beginning tutorial appears on the screen over your home page.  Upon closing this, across the top of your page, you see that this video can be accessed again.  You can alter your account settings and logout.  A tally is kept of all your grids and the interactions.


To make a grid move down the screen, choosing the blue + Add Grid button.  At this time you would name your grid and assign a password if it is not made public.  There are three other options for viewing; moderate a video response before it can be viewed, making the grid active when it is submitted and notification when a video is available.  Finally click the Add New Grid button.


A new screen pops up advising you about how to add a question, the URL link for this particular grid, and which icon to select for sharing your grid.  You can see how the list of your grids has now changed.  Your grid title is shown (1), you can change the color scheme of your grid (2), the number of questions on your grid (3), the date your grid was created (4), whether it is active (5), whether you are notified when videos are added (6), and icons for actions you can take with this grid (7).  The actions are a URL link for sharing, changing and adding security (per third image below), changing the title of your grid or deleting your grid.


You can see how each question is moderated; question, date, last response, number of responses and views, whether it is active, and the ability to share, edit or delete it.  When the blue Add New Question button is chosen, you type it in on a new window. Your text can be in bold or italics, you can change the date and decide to make it active or not.  Each new question appears at the top of the list.  You can drag them to alter the order.  Each question has a unique URL link. (I did not allow this to create more security, preferring videos not to be shown on social media.)


By clicking on the URL link for the entire grid, video replies can be made for one or more of the questions. To answer a question, click on it. At the next screen click on the big white plus sign. You are then asked if you are 13 years or older or have a parent, guardian or teacher present with you when you record.  When making a video you must also first agree to the terms of service shown.


You need to go through a few steps to check the operation of your webcam and microphone along with making a thumbnail photo.  When these are completed click Looks Good.  You then can record your answer.  If you are not satisfied with the video you can re-record.  Upon finishing click on Continue. 

Here is the link to my grid titled The Adventures of Beekle by Dan Santat. Here is the link to my response to one of the questions.  (The one take rule is a hoot tonight.) Please feel free to video your own responses to test out the site.  As an added note, if you want to see your questions, click on the grid title.  If you want to see responses to those questions, click on the question.  

No wonder this website has been honored in three Weebly categories!  It is so much fun to use and easy too.  Two big pluses are the non-registration of students and the ability to control security measures.  I highly recommend Flipgrid for interactive teaching and learning.   

Thursday, March 27, 2014

Bursting Into Video---FrameBlast

Just two days ago Heather Moorefield, Education Librarian at Virginia Tech and chairperson for the American Association of School Librarians Best Websites for Teaching & Learning mentioned in a tweet an app for Android phones and iOS devices.  (It can be installed on my Samsung phone but not my Samsung tablet even though the tablet is a newer version.)  It can be downloaded for free.  Users must be thirteen years or older providing completely accurate information when creating an account.  You are asked to check for changes in terms and conditions frequently.

FrameBlast is an HD video editor.  You can login using your Facebook or Twitter account.  To create a separate account you need to supply an email address and password along with a display name.

At the top of the initial screen in the upper left-hand corner you can access:

  • Home
  • Activity
  • Find Friends
  • My Blasts
  • My Profile
  • Help and
  • Settings.
By selecting the small video camera icon in the upper right-hand corner you are taken to the Create screen.  In the upper half of the screen is a play arrow in the center with a Save option in the upper right-hand corner.  To the left of an orange dot (on the lower half of the screen) are some musical notes.  That icon allows you to choose a tune from My library, Themes or No sound. If you choose the other icon (three rows of three dashes) you are taken to the Storyboard screen.  Beneath the orange dot you can change the effects of your images. Swipe up and down for filters, left and right for Edit Styles

When you tap the orange dot you are taken to the Shoot screen.  Every time you tap the orange dot at this screen, it takes a short video clip (three seconds).  If you press, hold and release you can start and stop the length of recording yourself.  When done capturing your images tap the back arrow in the upper left-hand corner.  Upon returning the shots you took are tied together into a video which plays immediately.  (This is pretty neat.) 

Those clips are also placed on your Storyboard.  The order of the clips can be changed by dragging them on the screen.  If you select a small box with a plus sign situated above your clips, you are taken to videos already on your device plus the ones you just added.  They have a green check mark on them.  If you remove the check mark they are no longer in your Storyboard.  

When you have all the clips taken and in order, select Save with a tap. (Currently 50 videos can be added to a Blast.)  As your Blast is saving helpful hints appear at the bottom of the screen like FAQs.  Once your Blast is saved, on the right in a band in the center of the screen is a share icon.

Your FrameBlast can be uploaded to YouTube, or shared on FrameBlast or Twitter.  Here is my first FrameBlast. Once the FrameBlast has been uploaded it appears in the activity screen of the app.  Viewers can like it or leave a comment.


I am so excited to have learned about this app.  It's as simple as can be to use with professional looking results.  The Android version is fairly new which makes it a plus for those without iOS devices. I recommend you give this a try for professional or personal use.

Tuesday, January 14, 2014

Beyond Video-Touchcast

In late November 2013 two members of my PLN on Twitter Shannon Miller, teacher librarian, consultant, presenter and blogger at Van Meter Library Voice and Heather Moorefield, Education Librarian at Virginia Tech and chairperson for the American Association of School Librarians Best Websites for Teaching & Learning, were chatting about websites and apps.  Heather mentioned her new big fave is TouchCast.  In early December she announced with joy about TouchCast being available for use on desktops.  It was introduced to the public in June 2013 as an iPad application only.

For my post today, I decided to see what I could create using TouchCast.  When you initially access the site, a TouchCast immediately appears on your screen using their application to explain it.  They describe it as:

Our mission is to usher in a new age of expression.  Anyone can easily create professional-quality videos combined with all the interactivity you expect to find inside a browser.  We call these TouchCasts, a new medium that looks like video but feels like the web.


After the TouchCast is completed the screen goes black with two separate tool bars; one at the top and one at the bottom.


When you mouse over the site logo, a drop-down menu contains links to Home, Products, Education, Developer, Accessories, About, Blog, Partnerships and Press.  Education takes you to a page explaining how teachers and students are using TouchCast in their classrooms.  It provides a 31 page downloadable PDF guide.

Moving left to right Products causes the introductory video to play again.  Watch is a link to featured and trending TouchCasts and channels of TouchCasts.  You can also do keyword searches for TouchCasts here.  The blog provides users with the latest updates.  TouchCasting Call is a currently-running contest for TouchCast creations due to end on January 24, 2014.  On the far right you can download either the app or desktop version.


The toolbar at the bottom is actually used for viewing a TouchCast.  You can control the volume, view a short description of the TouchCast (i), go back, play, stop, go forward, see the time length of the TouchCast, share on Facebook, Twitter, via URL or HTML code, shrink the screen or go to full screen.  If you scroll down beneath this, much more additional information about TouchCast is available through text and graphics including the Terms and Guidelines.  Touchcast requires users to be 13 years of age.  A free account gives you one hour of non-commercial content.

To begin I selected the download Desktop version.  A small window appears on the screen asking for your email address to use this beta version.  A link is sent to your email address immediately for downloading the application.

After the download a series of screens welcomes you to TouchCast, guides you in its use (touch the screen to open the vApps), explains features such as channels, ReCast and leaving comments and directs you to Watch for watching and exploring and Cast for making and sharing your own TouchCast. You can then register through Facebook or via an email address.  During the sign-up process you can enter in a logo for your channel or add details to your profile. 


If you choose to Watch, again tabs are available for featured, trending and channels.  You can view your TouchFeed (channels you like to watch) and bookmarks (Touchcasts you've selected).  When you choose Cast the screen below appears.  


Those images in the center of the screens are replaced with whoever is in front of your camcorder in a matter of seconds. I decided to select a theme first.   You pick your theme by using the right-hand arrow to scroll through the options (NEWS CAST, BUSINESSCAST, SPORTCAST, Here's How, Review It:, Travel Diary).  With the announcement of author Kate DiCamillo as the new National Ambassador for Young People's Literature, I thought I would try to make a TouchCast gathering resources.

When a selection is made a window prompts you to choose a title and search terms for beginning your TouchCast.


With that completed another overlay appears giving you directions.


For some reason the Twitter feed was adding any tweets with the name Kate in them, so I decided not to use it.  Google News seemed to consistently use Kate DiCamillo.  I then added web pages and a YouTube video to my video apps.  As each one is added they appear at the bottom of the page.  You can scroll through them by clicking on the Next Video App button.  


Each time you add an app you can either search using a term or enter in a URL.  I noticed when adding a YouTube video you need to use the URL at the top of the page rather than the one given in the share bar.  In order for any of these to be added, you need to be in preview mode before the green Add to video button (in the upper right-hand corner) is operative. 


When you add video apps you will have two screen options.  The blue frame allows you to size the app (For some reason I was unable to resize the apps on the screen even though the option is available except for the YouTube video.  It could be my computer.), minimize or hide the app or switch to the red frame.  When the app is framed in red you can interact within the app screen.


When you have your apps ready you can begin recording by clicking on the button in the lower right-hand corner.  To tell you the truth I was a bit nervous to begin knowing I was going to stick to the one-take rule. As you are recording simply click on the apps to add them to the video. 


You can also add graphics, a whiteboard, effects, and manipulate camera choices. (images move from right to left on the lower tool bar)


When you have finished recording, click on the done button.  You are then taken to a screen where your TouchCast is previewed. After previewing you can save the created TouchCast or re-record.  When you save the TouchCast sharing options through Facebook, Twitter and via email are made available.  I decided to click the large share button.

A new window appears uploading your TouchCast.  When viewing a TouchCast anything added to the video can be viewed in real time by simply clicking on it.  The video will continue as you are exploring those items which have been added.  Here is the link to my Touchcast about the New Ambassador for Young People's Literature, Kate DiCamillo.


I spent hours today exploring this new application, TouchCast.  There are many outstanding features which I did not include in my video or use in its creation.  As I stated in my TouchCast, this would be a fantastic tool to use in the classroom setting.  I highly recommend Touchcast.  


Tuesday, January 7, 2014

Virtual Post-It Boards-PixiClip And #MustReadin2014

On Sunday evening this tweet appeared in my stream from a name well-known in the librarianship field, Shannon Miller, teacher librarian, presenter, consultant and blogger at Van Meter Library Voice.


I decided to visit the website, exploring it for my weekly post.  PixiClip states in their What is Pixiclip? section:

Pixiclip is an online canvas that lets you communicate using a webcam or a mic.  Just click record and you're ready to go.  Pixiclip is your message in motion!


When you first access the page you will see a working menu on the left and What is Pixiclip?, Create a Pixiclip, Login or Sign up across the top of the page.  You can sign up by entering in a user name or by using either your Facebook or Twitter account. I typed in a username and clicked GO. (You can use Pixiclip without signing up.)


You are then asked to fill in your email address and a password.  Upon completion and by selecting Save, this window disappears leaving you with the blank board for using PixiClip.  The menu on the left allows the user multiple options.


By clicking on each one your mouse can act as a pencil or marker, type in text, move elements on the board, erase and undo.  The color which appears when using these tools can change with the six choices.  If you want to add video or audio, simply click on those icons.  Images can be uploaded from your computer or dragged and dropped into the box.

A grade 2/3/4 teacher at Admiral Seymour Elementary, an inner city school, in Vancouver, British Columbia and blogger at There's A Book For That, Carrie Gelson has been asking members of our PLN to blog about books they must read in 2014.  I thought using PixiClip might be a good way to generate my list.  I could combine vocal commentary with text and book jackets.

One of the first things I learned is that multiple images can be uploaded.  You can scroll through them by clicking on the arrow on the right-hand side.  I decided to only upload seven images at a time, although about ten can be viewed along the bottom without scrolling.  Even though you can resize images, only a certain amount can be placed on the visible board.  When you select an image it can also be deleted by clicking on the trash can icon.

It seems that images cannot be placed on the board unless you are recording audio or video.  If you pause your recording they can't be moved or resized.  You have three minutes to create a board before you are asked to save it.

In the prompt box you can title your PixiClip, add a short optional description, select pointer options (always show cursor, show cursor while doodling, never show cursor), determine a privacy setting (public, private, hidden, password protected) and preview it.  When you choose to share your PixiClip it can be done so on Facebook, Twitter, via email with a URL link or embedded using HTML code.  The embedded PixiClips play as soon as the page where they are is opened.  I decided to only embed one of them.


Here are my PixiClips as a participant in the #MustReadin2014 challenge.

(I apologize in advance for my overuse of certain words.  I did the one take rule for all of these. Plus I've already thought of some other books. Sigh.)

As far as ease of use, navigating around the site and creating a PixiClip, this site is wonderfully simple.  This online service/application, from I have been able to read, is very new.  It looks like it is still in beta. 

 One change which would be helpful is to be able to edit PixiClips once they have been completed.  Currently, as far as I can tell, you need to restart on the board to make certain changes (except for using erase and undo) or delete the entire PixiClip.  By using an email address to sign up, users would need to be 13 years old or have parental permission to register. 

I enjoyed using PixiClip.  I think it has great potential for use in our classrooms.  Richard Byrne at Free Technology for Teachers also has a post about it here.