
Quote of the Month

When love and skill work together, expect a miracle. John Ruskin


Showing posts with label screen capture. Show all posts

Tuesday, April 29, 2014

Testing One Two Three--Screencasting With Snagit In Google Chrome

About six weeks ago a tweet appeared in my feed about a new beta tool by TechSmith. (As of April 23, 2014 it is now out of beta.)  This is the same group which developed Jing, an American Association of School Librarians Best Websites for Teaching & Learning 2010.  I use Jing frequently as a screen capture tool with the ability to add an arrow, text, frame and highlight.  You can also use it to record short videos.  It is a free download.

TechSmith has another tool called Snagit.  Snagit has a free fifteen (15) day trial.  It costs $49.95 for a single license per year.  For qualifying educators there are different prices.  Snagit is like a super-duper Jing with many more features.  (This links to the full list of features for Windows users, Mac users.)

The newest tool is Screencasting in Snagit for Google Chrome.  One of the best features is having an image immediately saved to Google Drive.  A link is provided for easy sharing.  Your video can be uploaded to YouTube.  This tool is free.

To begin go to the home page Snagit for Google Chrome. You will need to download the Chrome Extension and Chrome Application.  (Links are provided.) The extension enables you to capture screen images within Chrome.  The application enables you to edit, share and manage your captures plus create new screencasts.  By clicking on the blue +Free button these items are added to your device.  When the application is added it now appears when you click on the Chrome Apps icon.  The extension is shown as an icon at the end of your browser address bar.


Before using these two tools, open the application and click on the small gear icon.  Make sure you place a check mark in the box for Enable experimental features. (Not sure if you still need to do this now that it's out of beta.)  At this screen you can also disable the microphone if you want to make a silent screencast or adjust your microphone volume.  Now you are ready to use the features of Snagit for Google Chrome.


Click on the extension icon to capture a portion or all of your entire screen.  Click and drag to get the perfect area.  You can add an arrow, frame or circle with five different color choices.  The shapes can be resized and rotated.  When adding text the size can be altered, made bold, placed in italics, underlined or text can be struck through the center.  When you click on Share a URL link is shown.  The file can also be renamed.  It is sent to your Google Chrome Library (the app) as well as your Google Drive. 
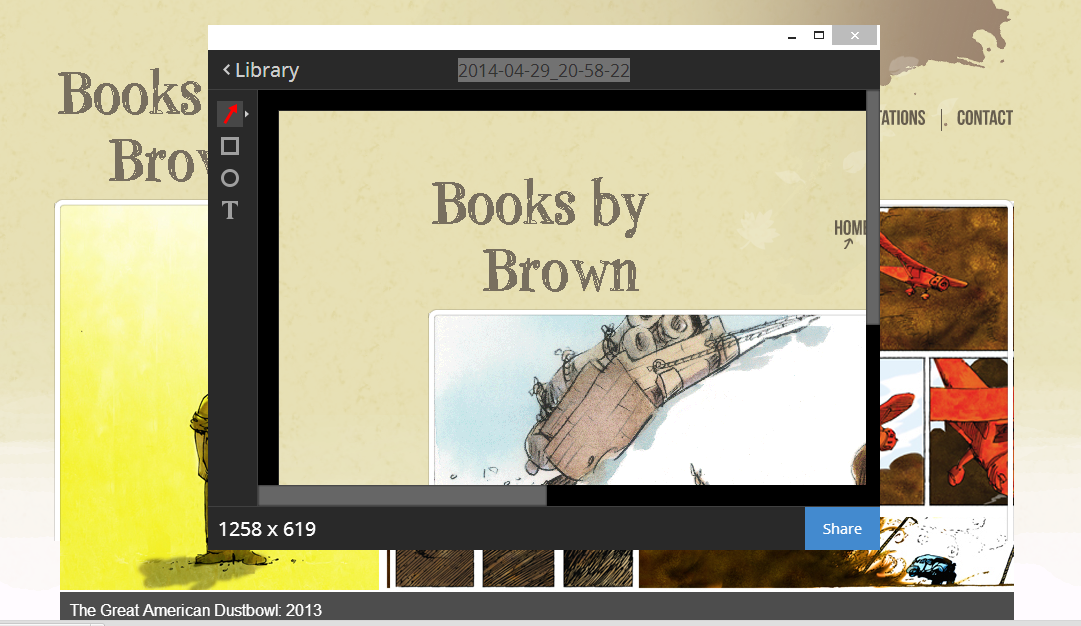

When you open the Snagit for Google Chrome app now, you will see the saved image as well as two small icons above it.  The plus sign is for adding a new screen recording.  The files allow you to see images only, recordings only or everything in your library.


Upon choosing the plus sign a new window opens asking you to choose what you desire to record. (I found that this window opened over the current open tab, showing it as the first choice.) Select the appropriate choice.  When you do, the recording begins immediately.


At the bottom of the screen, as the application is recording, you will see a button that reads Stop sharing.  When you are done recording, click this.  At the next window you can rename your screencast, preview it by selecting the play button or upload it to YouTube.  Once your video has been uploaded to YouTube, the URL link for sharing appears.  Here is the link to my screencast video. 


You could not ask for an easier tool to use for capturing an image and creating a screencast in Google Chrome.  Having images saved immediately to Google Drive eliminates a step and provides easy access.  The screencast was made, saved and shared in a matter of minutes.  The developers of this new tool are eager for input and ways you are using it in educational settings.  Follow the links announcing the beta and the coming out of beta for more information.  Have fun!

Wednesday, November 21, 2012

Image Annotations

Back in August, August 16, 2012 to be specific, Richard Byrne of Free Technology for Teachers featured a web 2.0 application in a blog post.  His post was quickly followed by praise for using this service in the classroom by Larry Ferlazzo of Larry Ferlazzo's Websites of the Day...  Any mention or endorsement by these two is cause for checking out a website.

Szoter provides users with the ability to annotate uploaded images, screenshots and webcam captures.  Free of charge it requires no registration or login.  You can use Szoter online or download a free Adobe Air Desktop version.

To run Szoter you need Adobe Flash Player 10.  If you wish to use the screenshot feature you will need to make sure Java Runtime is installed.  When accessing the home page you can toggle back and forth between the Introduction, Features and Showcase which is a four-minute-plus video presentation of how it works sans sound.

Click the Launch The Szoter Online red button in the lower left hand corner to begin.  You are first asked if you would like to:

  • load a local image
  • capture camera image
  • make a screenshot
  • load from URL.


I began by uploading an image from my computer, a book cover from the new title, Frankenstein: a Monstrous Parody written and illustrated by Ludworst Bemonster.  This image appears in the center of the work space.  In the corners of the work space, left to right, top to bottom, you can use tiny icons to move cropping frame, zoom the canvas in and out, fit the frame to content, reset frame size, remove all objects and the size of your image is given.  There are also small arrows in all the corners and in the center of each side which allow you to fit the frame to the image.

In the top center of your image another series of icons allow you to crop it , flip it (mirror view), switch it top to bottom, and change its position through a series of rotations.  On the left-hand side is a vertical toolbar offering the following options (all but the top one have keyboard commands which can be used):
  • select mode
  • scale/rotate
  • draw shape
  • draw line
  • draw frame
  • draw circle
  • draw arrow
  • add text
  • remove selected
  • change size (of a selected item)
  • undo
  • redo.

Anytime one of these items is added to the canvas they can be altered just as the image is to get the position exactly as you want. By clicking on the item a frame appears along with the flip and rotate icons.

An item can also be re-positioned by clicking and dragging.  If you wish to edit your text box, simply double click.  On the right-hand side of your work space is another vertical tool bar which allows for color changes and the moving of items to the front, back, up or down in relation to the other objects on the canvas.

In the upper right-hand corner is the third tool bar.  From there images can be uploaded, captured from your webcam, created with a screenshot or from a URL.  Your completed Szoter can be saved to your computer or published and shared.

When you click the publish and share button a smaller window pops up over your canvas.  It gives your creation a unique URL, the ability to share on Digg, Twitter or Facebook, HTML image code, HTML link code and a URL message board image link.  Here are two canvases I created.

http://i.szoter.com/7dfff3691a4869f7

http://i.szoter.com/d92ae6319633e723

A couple of important things to note when you are creating a canvas are:   if you add anything outside the frame around your image, you need to expand that frame to include those added items and you might need to resize the canvas, using the zoom in and out option and adjusting the frame, as a whole for it to fit on your blog or website.  The HTML embed code does not give you the ability to resize the image by adjusting a width or height number.  Also when you save a canvas to your computer you will need to add a file type (.jpg, .gif, .tif, .png).  Szoter does not do that automatically.

Uploading an image using a URL worked very well.  When I attempted to use the Szoter helper coupled with Java Runtime to take a screenshot I was informed that the application's digital signature had expired.  I did not proceed on that basis.  When I tried to use my webcam both in Google Chrome and Internet Explorer I could not get the image to transfer to the canvas.

With those observations being noted, I still think as a simple tool for annotating images uploaded directly from your computer or online using a URL, Szoter is a good application.  Not needing to register or login is a huge bonus in my book especially for younger students.  A further advantage is the unique URL you are given allows you to access and edit the initial canvas.

After you have entered in the URL, you are taken to a screen like this image.  Notice the small square orange icon with a pencil in the upper left-hand corner.  By clicking on that icon you are taken back to the original canvas to make any changes.


http://i.szoter.com/11fbbd4cefa7f352

Tuesday, April 17, 2012

Screen Capture With Zing

Under the Digital Storytelling heading using the Standards for the 21st Century Learner, the AASL, American Association of School Librarians selected Jing to appear on their 2010 list of Top 25 Websites for Teaching and Learning.  Jing is a free product provided by the TechSmith group.  The website claims:   Jing is a great tool for adding basic visual elements to all of your online conversations.

Capturing any size portion of your screen, sharing those screenshots on your blog, website, a social network, or via email, marking up those screenshots with an arrow, text box, highlight or picture caption, and when you send a screenshot to a place like Flickr a hyperlink is placed on your clipboard for instantaneous pasting, are all special features of Jing.  With Jing a short video (five minutes) can be made of what you say and do (mouse movements) on any given screen.  Whether your platform is Windows or Mac the software download is done within minutes.

With installation complete a tutorial pops up on your screen.  When the tutorial is completed you will be asked to create an account by giving an email address, display name, password and country.  By creating an account sharing is faster, secure and you are given a sizable amount of free space.

A sun, a yellow circle, will always be displayed top and center of your screen when Jing is open.  When you mouse over the sun three "rays" pop out; representing capture, history and more.  When the + sign, capture, icon is clicked a grid appears.  Size it over the area you wish to capture by clicking and dragging.

When you release your mouse several other options appear on the screen.  Left to right they are:  capture image, capture video, redo selection, and cancel.  The size of your screen capture is also shown. 

Initially I choose capture image.  A new screen pops up with a series of icons on the left and bottom of that screen.  Using icons on the left you can add an arrow, text, frame, highlight a portion of the screenshot, change your tool color, undo and redo.  At the bottom of the capture options are:  share via Screencast.com, save, copy, cancel or customize Jing buttons.

When adding text to the screen capture there is a fairly large selection of font choices.  Text size can be made smaller or larger.  There are nine basic colors for the tools or you can customize the color.  Each item added to the image can be sized using any of the four corners.  Delete an item by using the undo arrow.

When selecting the save button your completed screen capture is downloaded to your computer and a URL link is placed on your clipboard.  If I wish to share it using Screencast.com another file is created and it is viewed from that site at this link.  When I now click on the history ray of the sun, all the screen captures are shown, the one on my computer and the one located at Screencast.com.  My initial screen capture is of an interactive site about passengers aboard the Titanic.

If I wish to embed the screen capture in my blog with HTML code I need to do it via the TechSmith product, Screencast.com, 2GB of space is free.  Easy instructions for completing this process are supplied on site.

I decided to visit another interactive website regarding the history of the building of the Titanic and do a video capture.  Here is the link to that video.

Jing is an excellent web 2.0 application, easy to use, versatile and impressive.

Thursday, March 15, 2012

Beyond Screen Capture

If you are looking to make your screencasts more personal by adding audio, then a simple online tool to use is Screenr.  Screenr is free to users 13 years or older.  No registration is necessary before beginning your first screencast.

At the home page click RECORD in the middle of the page or the yellow bar reading:  Launch screen recorder now!  When you click either of these options a small window pops up advising you that the page uses Java.  A search will be made to determine if you have Java on your computer.  If not, it can be downloaded for free from that page.

That page must remain open when you are using Screenr.  Within seconds of that page's loading a dotted outline appears on your computer monitor.  This is the frame that will capture the exact portion of the screen upon which you wish to  focus.  It can be resized by dragging any of the small eight squares located in the corners and the side centers.  It can be moved around on the page with mouse placement.

When you have the screen in place click the red record button in the lower left hand corner.  Next to the record button is a graph illustrating the volume level of your voice.  Further right is the size of your screen. The last option is to cancel. As the instructions indicate press DONE when your recording is completed; five minutes is the allotted time.

You are able to move from page to page within that particular screen range, all activity is shown, as you record.  When you are done you can publish this screencast by logging in using your Facebook, Twitter, Google, Yahoo, LinkedIn, or WindowsLive ID account.  To complete the ability to publish the site asks for your email address and a username.  As you type in your username a URL link is created.

The next screen asks you to fill in a small description of your screencast.  You can preview the video and audio, deleting it if necessary.  (I highly recommend writing down what you wish to say during the screencast before starting.)  At this time you can click on a publish button or another publish button which takes you to the application you used to login.

A variety of options are available at the next screen.   Front and center, play or share can be chosen.  When you click on share a URL link and an HTML embed code are given.  To the right of your screencast you can share this on Facebook or Twitter as well as getting the link and code information again.

Beneath that you can choose download an .MP4 file, publish the screencast to YouTube or delete it.  A Screenr bookmarklet can be dragged to your browser toolbar for ease of use.  A confirmation email was sent to your box when you entered in that information.  After confirmation you can further comment on your screencast.


The benefit of using this application for me was not having to download any other software.  It is entirely web-based.  Screenr is going into my toolbox.

Tuesday, January 10, 2012

Notable Screen Capturing

On January 2, 2012 Richard Byrne at Free Technology for Teachers posted Three Ways to Mark-up Webpages and Share Them.  In that article one of the applications that he mentioned is Bounce.  Bounce, so named for the bouncing ball the moves across the screen while you wait for your screen to be captured, is both free and extremely easy to use.

At the home page enter in the URL of the web page that you wish to capture and click Grab Screenshot.  As soon as your screen is captured a small box pops up asking you to enter in your name.  Once you do that your mouse becomes a small + that you click and drag to surround those items on the page about which you wish to comment.  Once a frame is created the size can be altered and it can be dragged around on the page as well as deleted.

As I was drawing frames around the various points on the screen capture that I wished to bring to my readers attention, I had the original web page open on another tab so I could toggle back and forth between the two.  When you have a particular point on the page framed a text box appears.  When users want to read your comments all they need to do is mouse over the frame.  Once you have the selections made and annotated go back to the top of the page to enter in a title. (You must have at least one note on a page in order to save it.)

Then click on the save button in the upper right hand corner.  A unique URL for your personalized screen capture is generated.  You can immediately share this link via Facebook or Twitter.  When I selected to share it with Facebook it took me to my login.  Once I logged in, another screen appeared with a thumbnail of my screen capture, the URL link and the opportunity to comment before it was posted to my wall. 

When you are introducing a new resource to classes what a great way to direct them to specific items of importance on a page.  With an annotated screen capture students can work at their own pace; going back and forth between the original and the link that you have created.  Anyone that you share the link with can comment on the screen capture also, save their comments and share this newly annotated page with others.  Using this free web 2.0 application could not be easier and there is no registration. 

Here is the link to my screen capture--The Official Site of the Iditarod. 

Images can also be uploaded and annotated.  Here is a link to the annotated image of the central portion of the library media center.  This might be pretty handy when labeling images for a project.