Quote of the Month

When love and skill work together, expect a miracle. John Ruskin


Showing posts with label content. Show all posts

Wednesday, June 12, 2013

Saving And Sharing The Web---Quickly

As I have frequently in the past I look to the "best" lists for new web 2.0 applications to explore each week.  In his The Best Web 2.0 Applications for Education in 2012 educator and blogger at Larry Ferlazzo's Websites of the Day..., Larry Ferlazzo lists a service for organizing, saving and sharing information discovered on the Internet.  This service could be compared to Dragdis (and other similar applications listed in that review).

Quicklinkr can be used without registration and is free.  There are no Terms of Service guidelines only a Privacy Policy.  When accessing the home page on the left is a column of choices. Each are self-explanatory.  The Tumblr provides you with updates to the service and suggestions for use.

Quicklinkr allows you to collect all types of information, websites, links, images, podcasts, and videos, on any device.  It is billed as being easy peasey, lemon squeezy.  I began by selecting the pink Get Started button in the center of the initial page.

A window pops up advising you cookies are used and asks you to review the Privacy Policy.  If you are satisfied click the Yes, Get Started Already! button.  On a new screen your initial Quickboard appears.  Anything with a URL can be added to your Quickboard.

On the left side you can choose to register this Quickboard and your folders are listed.  The first open (default) folder is Public.  At the top are two new small icons.  The first (on the left) allows you to change your grid size from small to medium to large.  The second provides for adding, renaming and deleting folders.  Registration is required for completing these actions.


To the far right of these icons is the space for adding a URL to create Quicklinks.  Beneath these choices a temporary URL link has been generated for this Quickboard.  As many Quicklinks as desired can be added.  For the purposes of making sub-folders, changing the Quickboard to private or making a custom URL, again, registration is necessary.


When clicking on the small down arrow located at the end of the temporary URL link, a drop down menu lists the options for sharing your Quickboard.  To add a Quicklink copy and paste or type in a URL, then click the Quicklink button. A thumbnail, snapshot, of the website will be visible in the grid.
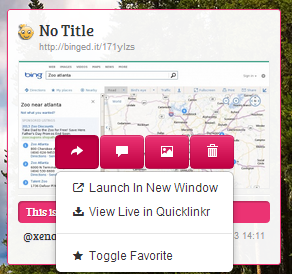

When you mouse over the snapshot four small pink buttons are visible allowing for sharing of the individual Quicklink, adding a comment, changing the image (they will search for another one or you can add a URL link) or deleting the link.  You have to be registered to leave comments.  To register provide your first and last name, email address, a password and username.  A validation email will be sent with a code to enter in at the Quicklinkr website.  Once registered the Quicklinks can be ordered on the grid by date added, last viewed and most viewed. (The image on the right shows how this link can be shared.)


If registered, upon logging in you are taken to your profile page.  On the left you can toggle between home, user settings, logging out and noting folders.  The user settings are general settings (to stay logged in, allow anyone to add Quicklinks to your board and allow registered users to comment), profile (changing password), appearance (12 different wallpapers for the page) and tools (adding a bookmarklet to your browser toolbar for Quicklinkr).


With the American Library Association annual convention coming at the end of the month with the awards banquet, I decided to create a Quicklinkr to celebrate The One and Only Ivan by Katherine Applegate, the Newbery Medal winner for 2013.  Here is a snapshot of that grid and this is the link.


Quicklinkr is everything they claim to be and more.  My post is late this morning because I could not stop looking for items to add to my Quickboard; it's that easy to use.  Being able to create a board without registering would make this great for students under the age of 13 to incorporate into research.  All they would have to do is save the original URL link.  This application is definitely going into my virtual toolbox.  One more thing to note is the prompt response to email; it's fast and friendly.

Wednesday, June 5, 2013

Create By Curation---Themeefy

For more than a year I have been wanting to try a curation tool I saw mentioned by Larry Ferlazzo on his blog, Larry Ferlazzo's Websites of the Day...  Previously I have posted about other similar tools, Scoop.it!, Storify, Pearltrees, Mentormob and Learnist.  With the flood of information from ever-increasing venues, it continues to be important to instruct our students in honing their curation skills.  The American Association of School Librarians' Standards for the 21st Century Learners draws attention to this need in several sections of Standard 1: Inquire, think critically and gain knowledge. 

Themeefy is a web 2.0 application that allows you to curate the social web and personal experiences, customize and publish learning.  This service is free.  The Terms of Service and Privacy Policy cover use by persons under the age of 13.  An informative section of the Privacy Policy, Children's Personal Information, states that districts using Themeefy need to make sure parental/guardian approval has been obtained.  The developers of this web 2.0 application intend for it to be utilized in an educational setting.

In the upper right-hand corner of the home page buttons provide you with the ability to create classrooms for implementing  the service (Classrooms Beta), Browse other developed magazines, drag a bookmarklet to your browser toolbar to easily place items in a Themeefy mag (Tools), Sign Up and Login.  In the center of the home page you can immediately begin to create a Themeefy magazine by choosing the general Create option or the Teach start-a-class choice.  For educators the Teach screen looks like the image below.  For purposes of this post, trying the application, I choose the Create option.


With a few clicks on the keyboard I had a theme name typed in and selected the Create Theme button. At this point I have not signed up yet.  The next screen, the workbench, provides a short text box type tour of many of the icons by clicking the forward and backward arrows. This is very helpful for a new user.

As soon as you arrive at the workbench the left side of the screen is filled with hits from a Google search of the theme name.  Beneath each item is the source link which gives you a chance to check for accuracy, relevance and authenticity.  You can type in new keywords in the search box to look for images in Flickr (moving from left to right with the icons), search for and add a URL link, upload files from your computer, upload images from the web or upload a file using a URL link, you can search for tweets on Twitter, create notes and search for videos on YouTube.  Each item can be previewed by clicking on the eye icon (taking you right to the website by opening up a window within the workbench) or added to your magazine by clicking on the plus sign. (1)

Your work in progress, magazine, appears on the right.  The title of your Themeefy can be altered with the click of a mouse.  By clicking on the pencil icon to the left of your title box, you are taken to the upload options.  (2)

After you click the plus sign for an item on the left, a copy shifts to the right with icons on the right for uploading, previewing and deleting.  Each time an item is added to your magazine the default image for Themeefy is shown.  When you upload an image, it replaces it.  You can also mouse over any text which originated with the item, change or add to it.

At any time during the adding of items to your magazine you can click the preview button above your column on the right. The first page is your title.  You can move forward and backward by using the arrows.  As noted the icon on the left opens up the upload choices.


The next page is your table of contents.  By clicking and dragging you can rearrange their order.  If you click on the title of the item it will take you to it immediately (except for some reason this would not work for the listed tweet pages). Videos can be viewed within a page.


The page for each item in your magazine has three icons on the left.  The top is for opening the three upload selections (1).  The middle icon takes you directly to the media listed (2).  If you want to head back to the table of contents, click the bottom icon (3)

For me getting images of maps in Bing worked better than Google maps.  They would open very well on the left in preview mode.  But they would not shift over to the right side correctly.

In order to share your work you need to sign up.  To register you need to provide your first and last name, email address and a password plus agree to the Terms of Service and Privacy Policy.  A new window opens to your profile page when this is completed.


Click on the bottom icon on the left side of your created magazine.  This will publish your work. You can share via a URL, on Facebook or Twitter, add a password so only certain people can view your work or unpublish the magazine.  Here is the link to my created magazine, Caldecott Medal 75 Years.  

If you get stuck during this process the FAQ section will help.  I did send an email with a question and I received a reply within minutes.  I inquired about having an HTML embed code for blogs and websites.  It is coming very soon.


The huge advantage of Themeefy is the educator piece, especially for students under the age of 13.  To be able to have a free account, adding students from classes, monitoring their work in a secure environment, is great.  The ability for students to collaborate on magazines is an excellent feature.

It really couldn't easier to use.  I was able to navigate between each of the ways to add items with absolutely no problems.  If you make a mistake there is always a window of opportunity to make corrections.

Themeefy is a must add to your virtual toolbox.

Wednesday, April 24, 2013

Simply The Simplest--Saving The Web

Each week new services appear to make curating and saving the content on the Internet more efficient, pleasing to view, and simple to manage. Toward the end of last month, Heather Moorefield-Lang, Education and Applied Social Sciences Librarian at Virginia Tech and former chair of the American Association of School Librarians Best Websites for Teaching and Learning committee mentioned a new web 2.0 app on Twitter that is a bit different from other similar applications such as Symbaloo, Bundlenut, WebList and Urlist.  Dragdis (dragdis) proclaims to be the simplest way to collect the web.

Still in private beta, you need to enter in your email address at the main site to receive an invitation prior to use.  My request was answered within twenty-four hours via email with a link to register.  To register provide an email address and password.

When registration is complete, a new window appears on your screen asking you to install the browser extension (Chrome, Firefox or Safari) to allow the drag and drop method for collecting web content. (It will show up as a tiny icon at the end of your URL line at the browser top.) When the extension has been added another window automatically pops up offering a short tutorial on using dragdis.  All you have to do is drag an item to the right of your screen; a menu slides out with options.


Initially at the top are three pre-named folders in which to place items.  The other three items give you a chance to practice moving and manipulating them from position to position by dragging.  I moved all of these to the trash at the bottom of the column adding my own.  If you make a mistake in naming a folder, open the folder, click again and edit.

Items remain in the trash until you empty it.  All you have to do is select Trash.  Your items there will appear on your dashboard and the word Trash changes to Empty Trash.


I began by going to author/illustrator Matthew Cordell's website.  To save a website move your mouse to the tiny notebook paper like icon preceding the name of the website. Click and drag it to the right.

When you move that icon to the right of your screen the toolbar listing all your folders becomes visible. When you add it to a folder, the words Click to tag or share pop up. Click on those to bring up another work space.  Here the site is named, you have the opportunity to add tags and notes (1), your item is assigned a unique URL (2) and you can share it via Facebook, Twitter or Google + (3)


To add a video from YouTube or Vimeo mouse over the video screen.  The small blue dragdis icon can now be seen in the upper left-hand corner.  Simply drag the symbol to the right.

When you do this, again the toolbar listing your folders will appear.  Once the item is added to a folder you can assign tags, write notes or share.  The adding of images is as simple as clicking on it and dragging it to the right.


If you wish to just save a portion of text from a site, highlight it, click and drag it to the right also.  Every time an item is included in your dragdis it becomes part of the screen at your home space.  If you want to locate a specific item, type the keywords into the search box above the folders and double click.  Then only those items will appear on the home space screen until you click on home again.


By clicking on the down arrow next to your email address, you can access a list of functions.
 The first takes you to the three browser extensions for downloading and the second is to change your password.  The about section explains the application, the terms of service, the privacy policy and how to contact the developers.  Users must be 13 years or older to use this site, no exceptions.

If you should have any questions or comments the feedback form is a good option.  When I used this I received a courteous reply within a few hours.


To view items you have saved, select them from an opened folder.  Videos can be viewed in your dragdis.  Websites are hyperlinked in your item. Click on the title to go directly to the saved page.  (You can choose the Source to go to the website, too.) Of course, images and text can be viewed from the dashboard within dragdis. To exit this screen click above the box.


Dragdis truly is the simplest means of saving web content. With a single step items are placed in folders for instant recall.  If you don't have a folder designated for your item, create a folder with a simple mouse click. This is an application I will be using on a daily basis.  (When you receive an invitation you too have the choice to issue an invite to five other people.)