Quote of the Month

When love and skill work together, expect a miracle. John Ruskin


Showing posts with label productivity. Show all posts

Tuesday, May 27, 2014

And The Answer Is...

A week ago Heather Moorefield, Education Librarian at Virginia Tech and chairperson for the American Association of School Librarians Best Websites for Teaching & Learning tweeted about a new site which features a product for classroom or lesson review like a game show.  Although some have ended their school year, many will be working with students until mid-June.  At first glance this seems to be a FUNtastic way to check for understanding on any given topic.

To the best of my knowledge FlipQuiz in its current form was released in February of this year.  You need to be eighteen years of age to create boards.  If you are between the age of thirteen and eighteen your parent(s) or guardian(s) can sign up for you.  No one under thirteen is to register.  This service is free. (There is a pro pricing for $7.00 per month. It allows you to have team scoring, upload images, and copy the boards of other users, plus more.)

On the right side of the navigation bar you can click on a tab for features, see a demo, login or sign up.  The key features are questions and answers (if you desire) are seen online, boards can be created and saved for later use, boards can be accessed from anywhere, engaging layout and design.  To sign up you need to choose a user name, provide your email address and a password, your first and last name, verify you are human, and select a membership level (free or pro).


Registration completed, you are taken to your dashboard.  Using the Search & Discover (3) button you are taken to a new window.  Searches can be done by keyword or most recently created boards.  You can choose to Create a Quiz Board (1), view your profile (2), see all your boards (4) or update your account information (5).  By selecting the right arrow key you will be logged out.


After choosing Create a Quiz Board a new screen appears.  First give your board a title.  You will be generating questions (and answers if you desire) for six categories. 


Text can be written in bold, italics or underlined (1), subscript or superscript (2), a link can be inserted (3), an image can be inserted using a URL (4) and a video can be included as well (5).  The insertion of images can be as simple or sophisticated as you desire.  Videos from sixteen different providers can be part of the question or answer.  Instructions are given on which URL to use to add videos.   It's a good idea to save the board after each category is completed.  


Once you have your questions (and answers) completed for the number of categories you wish to include, you can add a cover to your board by uploading an image from your computer. At any time you can edit the entire board or a single item on the board. From the dashboard you can access your quiz board, editing it, viewing it in presentation mode or deleting it.


I am looking forward to using FlipQuiz more in the future.  It is extremely easy to use with professional looking results.  I believe students will enjoy using this for quick, simple review in your classrooms.  

Wednesday, May 14, 2014

Inspirational Sound

Twice last week one of my favorite people for learning about new websites and apps, Heather Moorefield, Education Librarian at Virginia Tech and chairperson for the American Association of School Librarians Best Websites for Teaching & Learning sent out tweets about a web 2.0 application she feels is worthy of exploration.  The original platform Booktrack: Soundtrack for Books was officially launched on January 5, 2012.  The company launched their dedicated education platform on March 21, 2014.  It is called Booktrack Classroom.  In their about section they state:

Booktrack Classroom is an exciting new technology that synchronizes audio with text to create an immersive reading experience.

When first accessing the home page the navigation bar along the top invites you to go to separate pages if you are teachers, parents, need help, want to log in or click on the free to use button.  You can also view a short video about the site, read six research-based features, and visit another page as a student.  At the bottom of the home page you can read the about section, the teachers' blog, a lesson plan library grouped by elementary, middle and high school ages, press releases, university studies, the terms of service and privacy policy (very detailed) and go to the download page.


To begin using the site I clicked on the green Free to Use button.  A new window opens with several choices, bookshelf, create, register, login and help, available at the top.  I clicked on the register tab.  A form pops up asking you for your display name, email address, and password.  You need to read and accept the terms of service and privacy policy.  An account confirmation email is sent immediately.  You should note that students under the age of 18 need to have a parent or guardian read and accept the terms of service and privacy policy before they can use this site.  This was stated in the terms of service.


When your account is created and you have logged in, you can then create a classroom.  For the purposes of this review I will only have a single student.  When I selected the + Add a Class button a new window opens.  You are asked to enter in a class name, country, school, grade year, school year and a rating.


Once you save your class, you can add student first and last names.  I then clicked on the student details tab.  Enter in a student's name, clicking add when you are done. As you can see in the images below you have the option to choose a common password, and select all to block, unblock, delete and change password.  I have added one student.  It shows their name, login name and assigned password.


To continue with my tour of Booktrack Classroom I selected the Bookshelf tab.  At this new window you can view previously created Booktracks.  They are grouped by content, genres, styles, and languages.  They each have star ratings. If you choose to read one the second image below appears on your screen.  When clicking on read the third image appears advising you on the options for reading the selection. Simply click in the middle to start.  


I then went to the top navigation bar choosing create.  Again an overlay with complete, easy-to-understand instructions appears. Click anywhere to begin.  First you type in a title for your chapter, then type in or copy and paste the text.  You can make any of the text bold or in italics.  There is an undo and redo option.  


Before moving to sound I did select save.  Upon clicking on the sound tab a new overlay appears giving you more instructions.  Click anywhere to start.  After your text is highlighted you can choose between music, ambience and effect.  


With your choice made more options appear above the highlighted text.  You can change the track, adjust the volume, the fade in and fade out seconds, choose to loop or delete.  Plus at any time you can view your work in the reader.  Again before clicking on publish I saved my work.


At the publish screen you add a title, the author and creator are entered in for you, a description, genre, type, rating and language.  You retain the copyright of everything which you held prior to creating this Booktrack.  When you select to create a cover, you are adding text with font style options, font size choice, font color and bold or in italics text.  Clicking adds the text box.  Double clicking allows you to make changes.  You can upload a cover image from your computer or browse through their gallery.


You can save, publish or delete your final work.  Choosing publish causes a new window to open asking in which class you would like the Booktrack placed based on your rating.  Make sure you place a check mark in the correct library box; otherwise your Booktrack will not appear on a bookshelf.  Once a Booktrack is on a bookshelf it can be read.


This application makes the reading of your writing much more engaging; actually fascinating.  Including sound with your written words gives them an emotional edge.  I highly recommend you give Booktrack Classroom a try.  My Booktrack, because I created a teacher account, is only available to me and my students.  You can go to the site and read other previously created Booktracks.  I do have a question submitted to see if I can make my Booktrack available to others.  UPDATE In order to make a Booktrack available to the public, you need to use the original global platform linked above.

Tuesday, April 29, 2014

Testing One Two Three--Screencasting With Snagit In Google Chrome

About six weeks ago a tweet appeared in my feed about a new beta tool by TechSmith. (As of April 23, 2014 it is now out of beta.)  This is the same group which developed Jing, an American Association of School Librarians Best Websites for Teaching & Learning 2010.  I use Jing frequently as a screen capture tool with the ability to add an arrow, text, frame and highlight.  You can also use it to record short videos.  It is a free download.

TechSmith has another tool called Snagit.  Snagit has a free fifteen (15) day trial.  It costs $49.95 for a single license per year.  For qualifying educators there are different prices.  Snagit is like a super-duper Jing with many more features.  (This links to the full list of features for Windows users, Mac users.)

The newest tool is Screencasting in Snagit for Google Chrome.  One of the best features is having an image immediately saved to Google Drive.  A link is provided for easy sharing.  Your video can be uploaded to YouTube.  This tool is free.

To begin go to the home page Snagit for Google Chrome. You will need to download the Chrome Extension and Chrome Application.  (Links are provided.) The extension enables you to capture screen images within Chrome.  The application enables you to edit, share and manage your captures plus create new screencasts.  By clicking on the blue +Free button these items are added to your device.  When the application is added it now appears when you click on the Chrome Apps icon.  The extension is shown as an icon at the end of your browser address bar.


Before using these two tools, open the application and click on the small gear icon.  Make sure you place a check mark in the box for Enable experimental features. (Not sure if you still need to do this now that it's out of beta.)  At this screen you can also disable the microphone if you want to make a silent screencast or adjust your microphone volume.  Now you are ready to use the features of Snagit for Google Chrome.


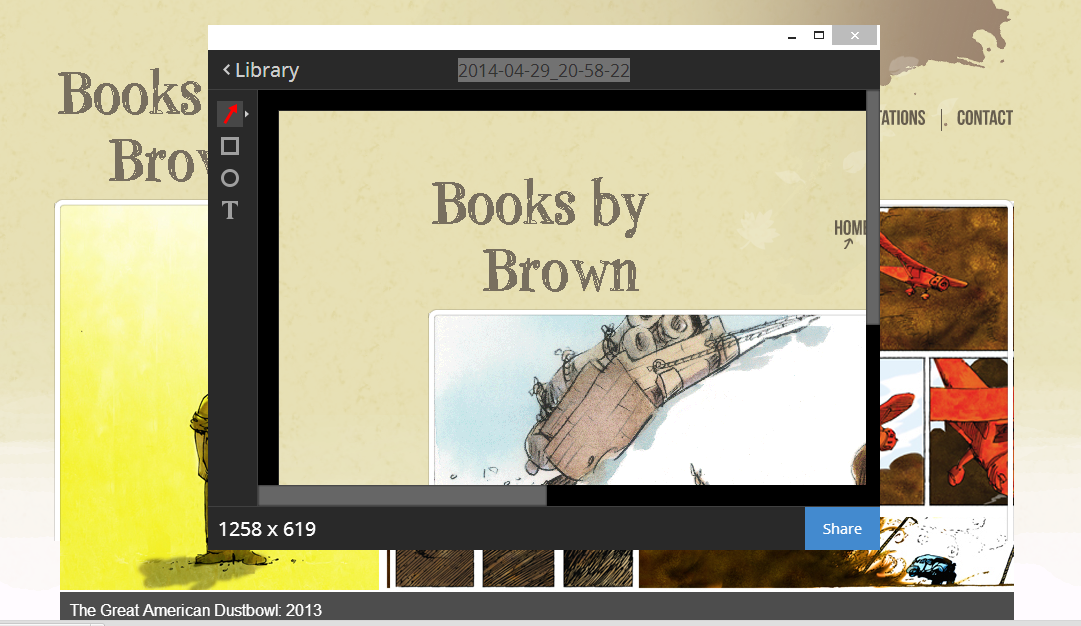
Click on the extension icon to capture a portion or all of your entire screen.  Click and drag to get the perfect area.  You can add an arrow, frame or circle with five different color choices.  The shapes can be resized and rotated.  When adding text the size can be altered, made bold, placed in italics, underlined or text can be struck through the center.  When you click on Share a URL link is shown.  The file can also be renamed.  It is sent to your Google Chrome Library (the app) as well as your Google Drive. 


When you open the Snagit for Google Chrome app now, you will see the saved image as well as two small icons above it.  The plus sign is for adding a new screen recording.  The files allow you to see images only, recordings only or everything in your library.


Upon choosing the plus sign a new window opens asking you to choose what you desire to record. (I found that this window opened over the current open tab, showing it as the first choice.) Select the appropriate choice.  When you do, the recording begins immediately.


At the bottom of the screen, as the application is recording, you will see a button that reads Stop sharing.  When you are done recording, click this.  At the next window you can rename your screencast, preview it by selecting the play button or upload it to YouTube.  Once your video has been uploaded to YouTube, the URL link for sharing appears.  Here is the link to my screencast video. 


You could not ask for an easier tool to use for capturing an image and creating a screencast in Google Chrome.  Having images saved immediately to Google Drive eliminates a step and provides easy access.  The screencast was made, saved and shared in a matter of minutes.  The developers of this new tool are eager for input and ways you are using it in educational settings.  Follow the links announcing the beta and the coming out of beta for more information.  Have fun!

Tuesday, April 15, 2014

Flip For Flipgrid--Student Video Responses To Questions

This tweet certainly caught my attention.

When it was quickly followed by these, I knew what my next site to explore would be.


According to information at the home page, Flipgrid is a means for teachers to generate grids of short discussion-style questions.   Students reply to those questions through video.   Everyone can share the videos.


Each grid is composed of any group with a common element with an unlimited number of questions and unlimited number of responses per query available.  The cost is $65.00 per year for the teacher which includes ten grids.  There is a twenty-one day trial period available.  Students do not pay or register.

Communication with students is done via email.  They can create a snapshot photo with fun filters prior to recording their video using their device's (computer and iPad currently) webcam.  Videos are ninety seconds long.  The privacy and sharing is dictated by the administrator (teacher).

In the upper right-hand corner you can Get Started, read the informative FAQ, log in as the administrator or complete a form to contact the Flipgrid team. A new window overlays the home page when Get Started is selected.  You need to specify the type of educational institution.


After choosing Next Step, the new screen explains the pricing.  For the purpose of this post, I choose Demo.  When the form is completed, the terms of service read and the final green bar is clicked, an activation email is sent to get your account started.  You are asked to create a password.


When you log in for the first time, a beginning tutorial appears on the screen over your home page.  Upon closing this, across the top of your page, you see that this video can be accessed again.  You can alter your account settings and logout.  A tally is kept of all your grids and the interactions.


To make a grid move down the screen, choosing the blue + Add Grid button.  At this time you would name your grid and assign a password if it is not made public.  There are three other options for viewing; moderate a video response before it can be viewed, making the grid active when it is submitted and notification when a video is available.  Finally click the Add New Grid button.


A new screen pops up advising you about how to add a question, the URL link for this particular grid, and which icon to select for sharing your grid.  You can see how the list of your grids has now changed.  Your grid title is shown (1), you can change the color scheme of your grid (2), the number of questions on your grid (3), the date your grid was created (4), whether it is active (5), whether you are notified when videos are added (6), and icons for actions you can take with this grid (7).  The actions are a URL link for sharing, changing and adding security (per third image below), changing the title of your grid or deleting your grid.


You can see how each question is moderated; question, date, last response, number of responses and views, whether it is active, and the ability to share, edit or delete it.  When the blue Add New Question button is chosen, you type it in on a new window. Your text can be in bold or italics, you can change the date and decide to make it active or not.  Each new question appears at the top of the list.  You can drag them to alter the order.  Each question has a unique URL link. (I did not allow this to create more security, preferring videos not to be shown on social media.)


By clicking on the URL link for the entire grid, video replies can be made for one or more of the questions. To answer a question, click on it. At the next screen click on the big white plus sign. You are then asked if you are 13 years or older or have a parent, guardian or teacher present with you when you record.  When making a video you must also first agree to the terms of service shown.


You need to go through a few steps to check the operation of your webcam and microphone along with making a thumbnail photo.  When these are completed click Looks Good.  You then can record your answer.  If you are not satisfied with the video you can re-record.  Upon finishing click on Continue. 

Here is the link to my grid titled The Adventures of Beekle by Dan Santat. Here is the link to my response to one of the questions.  (The one take rule is a hoot tonight.) Please feel free to video your own responses to test out the site.  As an added note, if you want to see your questions, click on the grid title.  If you want to see responses to those questions, click on the question.  

No wonder this website has been honored in three Weebly categories!  It is so much fun to use and easy too.  Two big pluses are the non-registration of students and the ability to control security measures.  I highly recommend Flipgrid for interactive teaching and learning.