
- lets anyone create annotatable, audible, beautiful notes that can be folded like paper
- maintains automated revision list to aid timely revision
- allows students/teachers to keep notes private or publish them and
- features ability to add complex math, computer code, add images, explain notes with text and image annotations etc.
According to the Terms of Service (which are much easier to read and understand than most) if users are under the age of 13 they must be supervised by an adult. In the Privacy Policy they say:
We do not share information collected from anyone, regardless of their age. Classmint compiles with the US Children's Online Privacy Protection Act ("COPPA"), which requires us to notify and obtain consent from a parent or guardian before we collect, use and disclose the personal information of children who are under 13 years of age.
At the top of the home page the first advisable thing to do is create an account. Add your first and last name, email address and a password to start. When this is completed another window opens asking you to login with your email address and password. When you do this, the screen below appears.

Classmint has created a series of notes describing the site and how to use it. Getting Started with Classmint explains the premise behind the application, the fold button, notes player and the explain tool. Classmint is based upon active recall and Cornell Notes. Using the notes player a user can listen to the text on the left hand side. The explain tool allows you to include greater detail with any notes.
Using the Note Editor is a step-by-step clarification for creating notes. Each icon on the toolbar is fully described in text and images. A Cornell Note about Cornell Notes is a guide for taking notes using this method. Classmint for Teachers briefly outlines how an educator could use this as a tool for student learning. When each of these notes were opened they were copied into my Revision List.
To further understand how notes can be used, I decided to create a note introducing the parts of a book and a few important people connected with creating a book. To begin click on the +New Note button at the top of the screen. A new window as shown below appears. You are on step 1, Create Note.

First give a title to your note (1). Be sure to add a subject for the purpose of having students search for the note (4). On the left hand side add those terms you wish to identify or questions needing answers (3). On the right place definitions of those words or the answers (2).

As soon as you click on Keywords or Questions or Notes or Details about Keywords or Questions, the toolbar appears on the screen. From left to right the icons represent: bold or italics text, two types of bulleted lists, adding a URL hyperlink, including a quote, two types of indenting, undo and redo, inserting an image, adding a mathematical formula and HTML code. At this time images can only be inserted using a web link.
When you start a note two sections are shown. Every time you click the blue +Section button on the

When this was finished I clicked on the green Save button. You are now on step 2, Save & Explain. At this point you can highlight any portion of the text. When you do this you have the option to include more information about what is highlighted or tweet about it. When you click, Explain, a small tool bar offers the options of inserting an image, a link, undo, redo, adding code or a formula as well as the text box. The two images below illustrate this step.


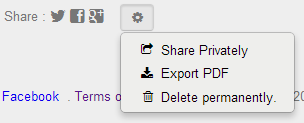 When this is completed to your satisfaction, click the green Publish button. When you publish your note it is available to the public. At the bottom of your note are a series of small icons. You can share your note on Twitter, Facebook, Google+ or share it privately, export it as a PDF or delete it permanently. Here is the link to the note I generated titled What is a Book?
This is a fairly new web 2.0 application which I believe has potential. It is easy to use. I like the interactive feature of folding the note, so the left side can be viewed without looking at the right side. Being able to have the Keywords/Questions read aloud is another plus. For use in the classroom setting, it will be even better when your own images can be uploaded from your computer. I invite you to give this application a try. The designers of the site are open to suggestions.
No comments:
Post a Comment